FULLBY PREMIUM - "BIG GRID" + 7 Headers
Responsive Grid Wordpress Theme
by MarchettiDesign.net
Release: Semptember 30 2015
Version: 1.7
Support: https://www.marchettidesign.net/shop/my-account/
Plug-in: WooCommerce & Polylang Ready
Hi! thanks for downloading FULLBY Premium Theme. This is a simply step by step guide to use and customize correctly the theme.
Let's go!
1. Theme Installation
To install your theme in WordPress you must navigate to the menu "Appearance" on the left and then the submenu "Themes".
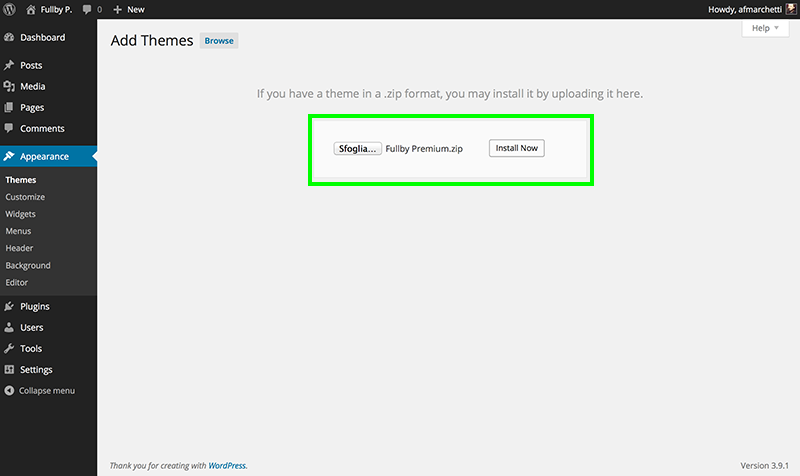
Now click "Add New" button and then "Upload Theme".
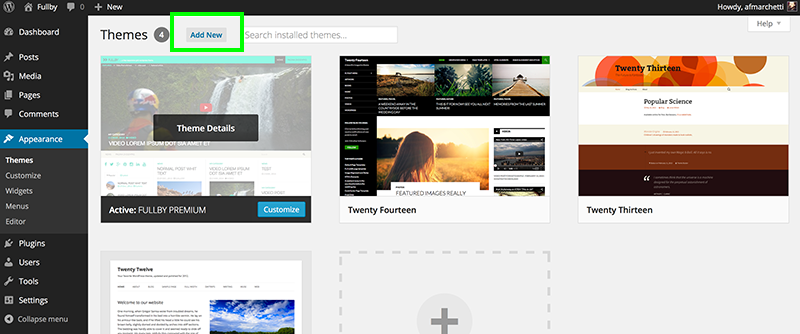
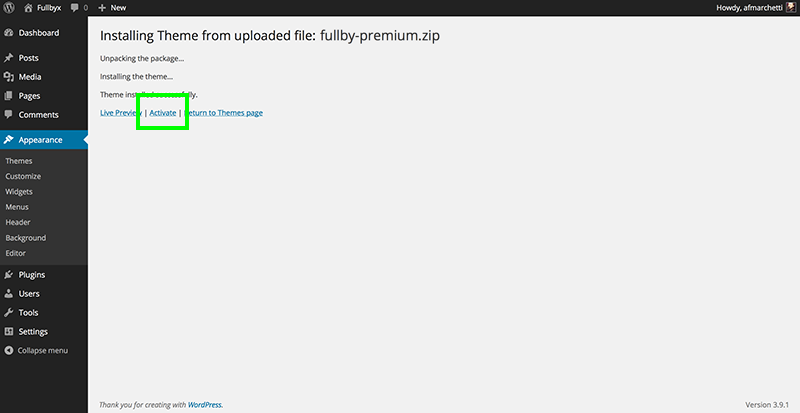
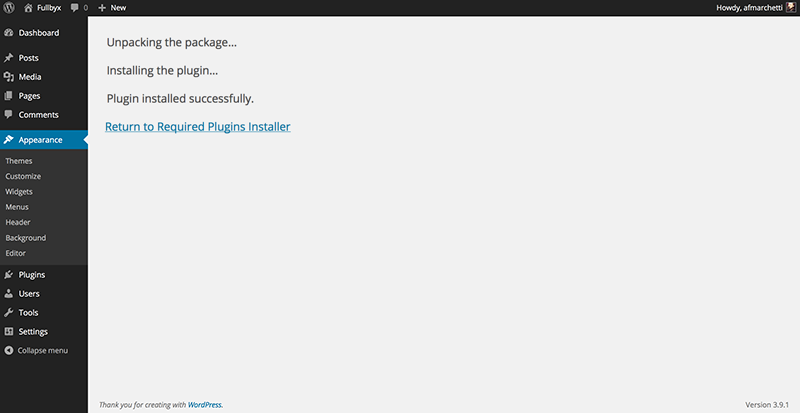
You should click Choose File, find your theme fullby-premium.zip file in your computer and then click "Install Now".
Then click "Activate".
The plugin message appears: "This theme requires the following plugin: FULLBY Functionality Plugin". Click Begin installing plugin
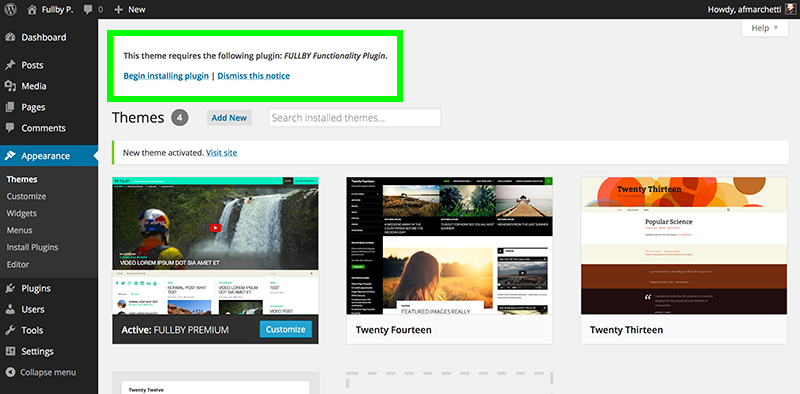
After this, hover the name of FULLBY Functionality Plugin and click "Install".
Go to plug-in section and "Activate" FULLBY Functionality Plugin
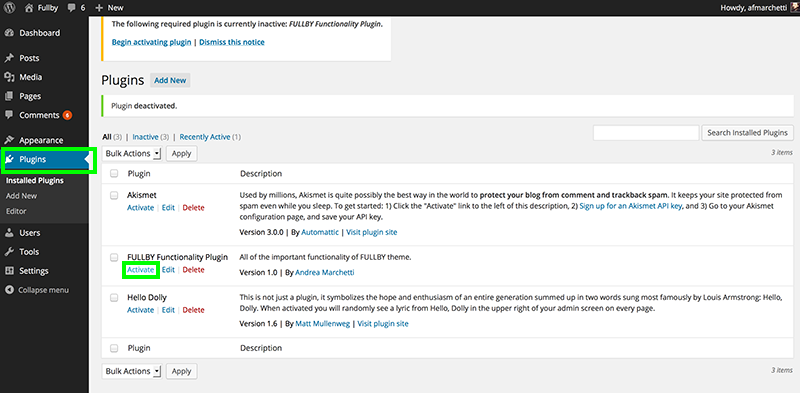
Now all the features are activated.
2. Icon and Site Title
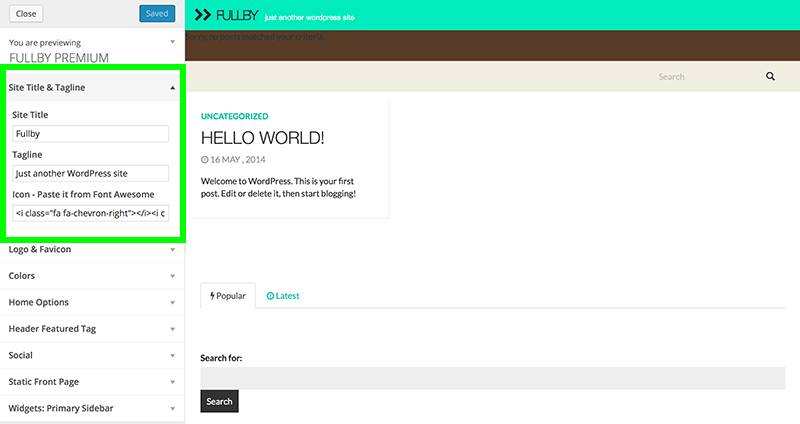
In the theme customizer section you can easily set Icon and Title of the site.
Visit any page of your website and use the admin bar at the top, hover your website title then click Customize.

This will open up options for modifying title, logo, layout, colors and social icons.
Click Site Title & Tagline, insert your text and click save.
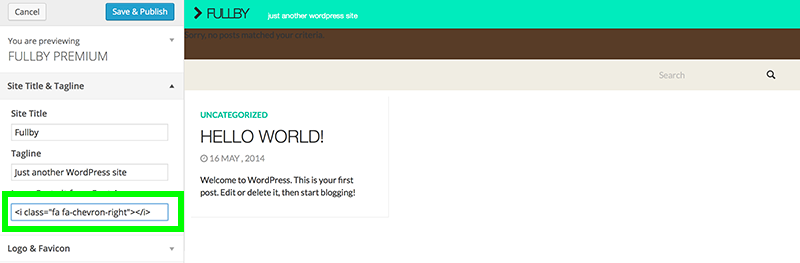
To change the icon, go to Font Awesome collection page: http://fortawesome.github.io/Font-Awesome/icons/
Choose an icon, Copy the code and Paste it in the icon input.
You can use these icons in the content of the site (Articles, Pages), simply pasting the code of an icon:
http://fortawesome.github.io/Font-Awesome/icons/
in wordpress editor text section.
3. Logo and Favicon
In the theme customizer section you can easily set the site Logo and Favicon.
Hover your website title then click Customize.
Select Logo & Favicon, click on "no image" button to upload an image for the logo.
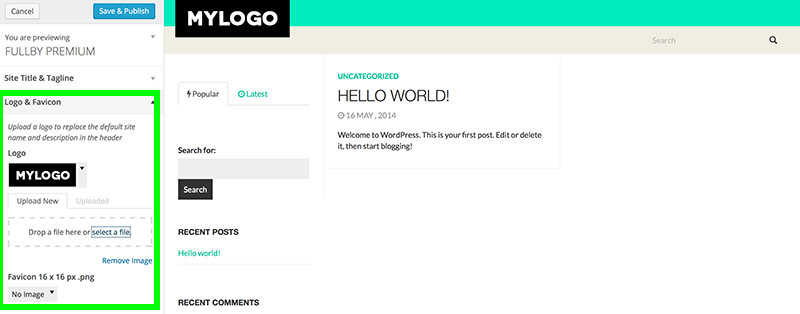
Do the same for the Favicon (the image will be 16px x 16px).
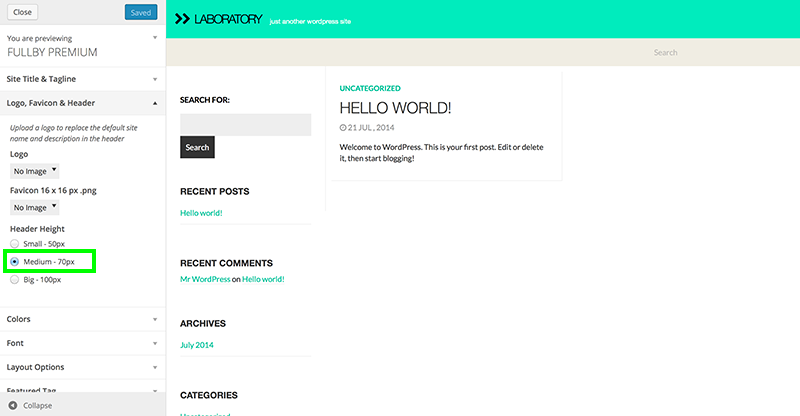
3.1 Header Height
You can choose from 3 header height: small (50px), medium (70px) and big (100px). Select the height and click save.
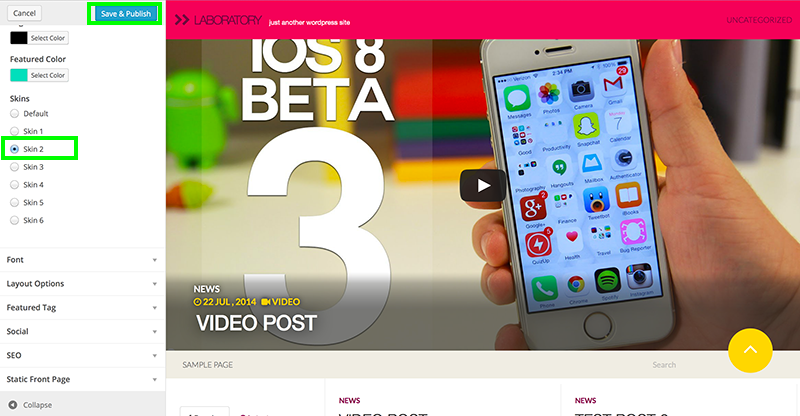
4. Colors & Skin
You can easily adjust all the colors of the theme. Select Colors in the theme customizer section.
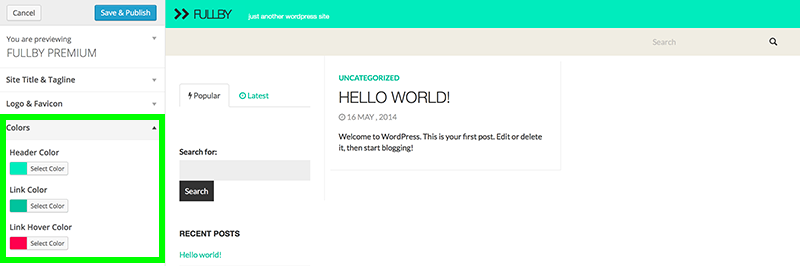
Choose your color and click Save.
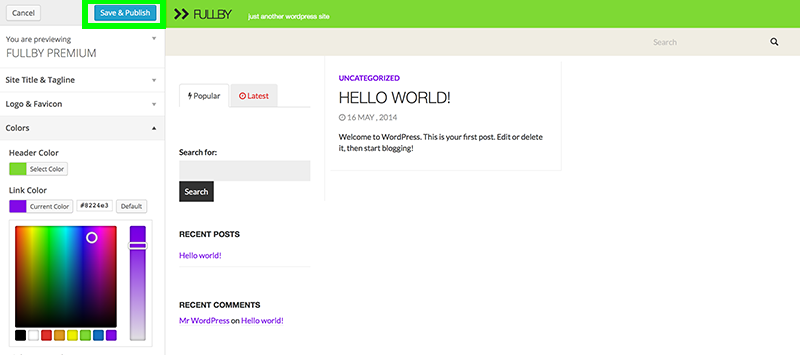
You can use one of the 12 Skin available. Choose a skin and click Save.
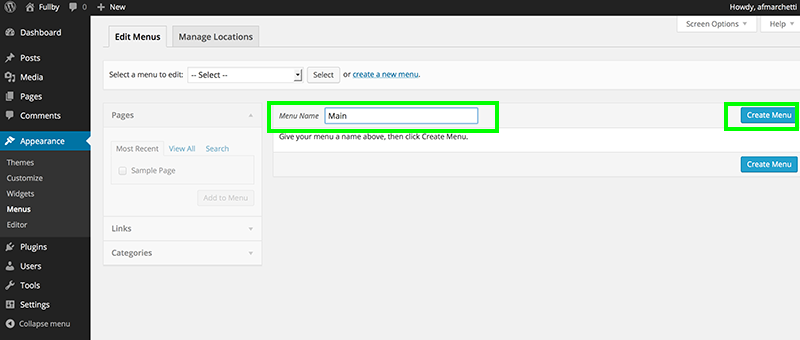
5. Navigation Menus
Both of the Navigation Menus (Main and Sub) are edited in the Appearance section under Menus.
To start, create the Primary Menu Navigation. In the menu name box enter "Main" and click Create Menu.
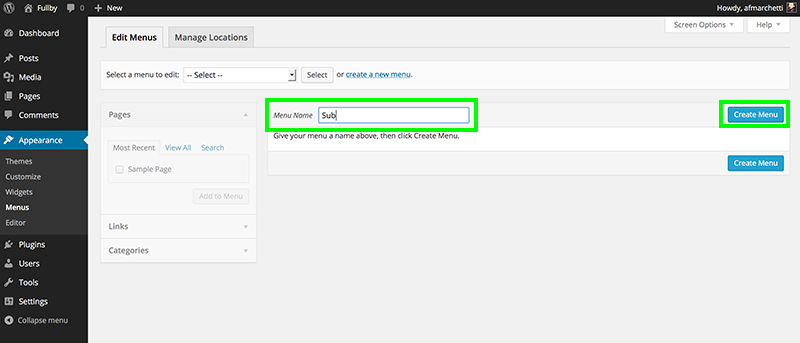
After this click create new menu (the Secondary Menu). Enter "Sub" and click Create Menu.
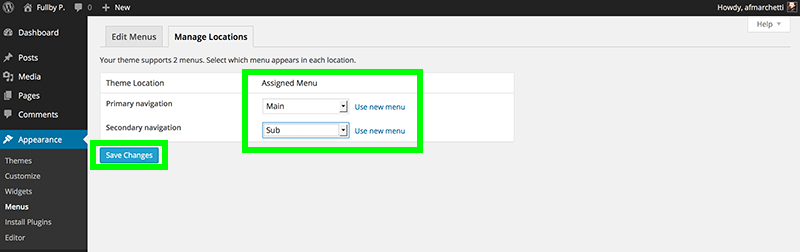
5.1 Select a Menu under Theme Locations
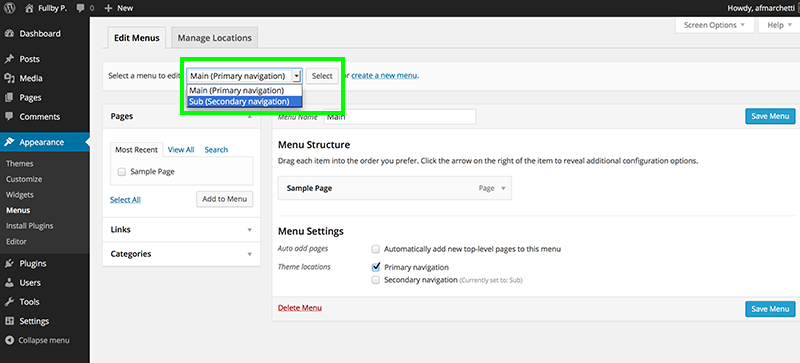
Once you've created the menus, next step is select the Main as the Primary Navigation and Sub as the Secondary Navigation.
Under the Manage Locations selected your navigation from the drop-down and click Save.
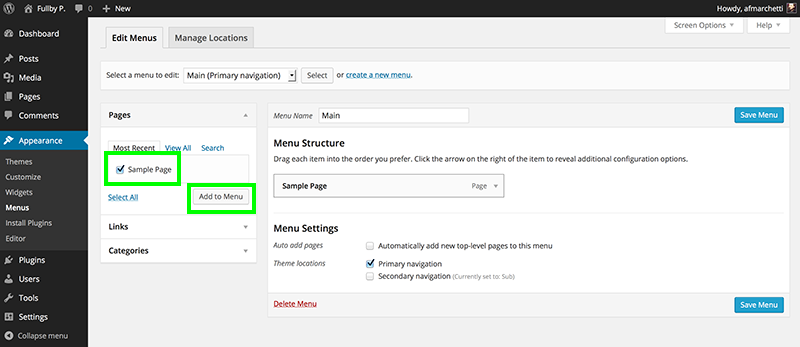
5.2 Add pages to your Menu
The final step is adding pages and links to your newly created Menu. Select the tab edit menus. You can just select a page via the check-box and click Add to Menu.
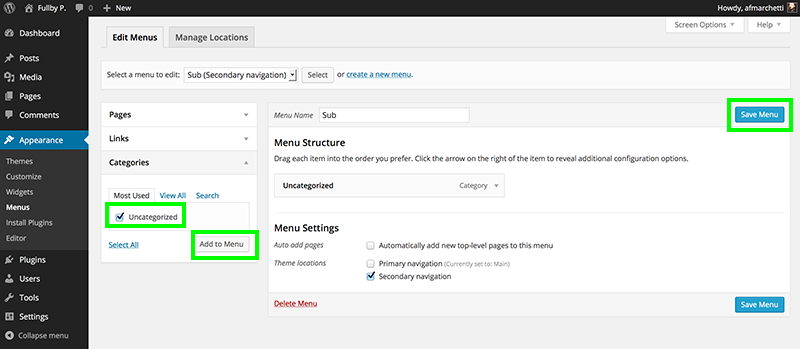
To edit the other menu use "Select a menu to edit" to choose the second menu and click select.
Add page or category to the sub menu and click "Save Menu"
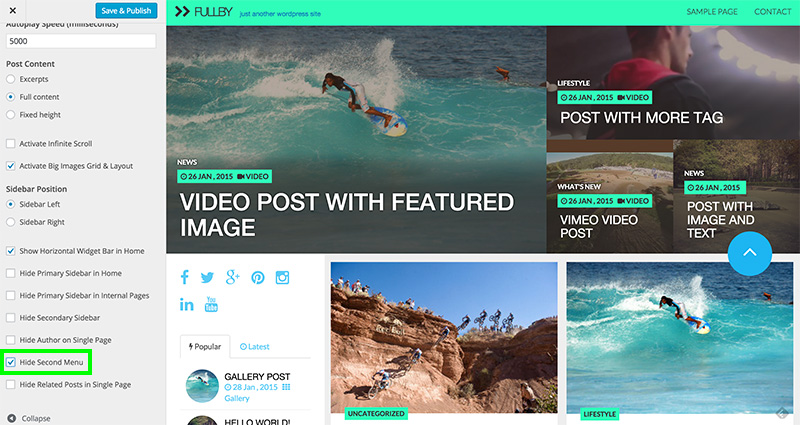
5.3 Hide Second Menu
To hide the Second Menu, click Hide Second Menu in Layout Options Section.
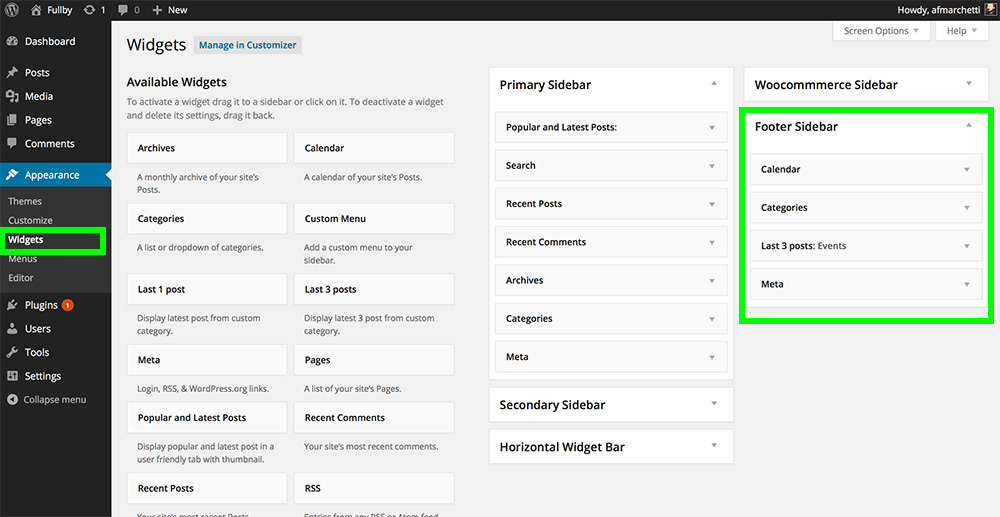
6. Sidebars & Horizontal Bar
All the Sidebars (Left, Right and Horizontal) are edited in the Appearance section under Widgets.
Drag and drop widgets to the sidebars. Primary sidebar on the left. Secondary sidebar on the left bottom, Horizontal on the right.
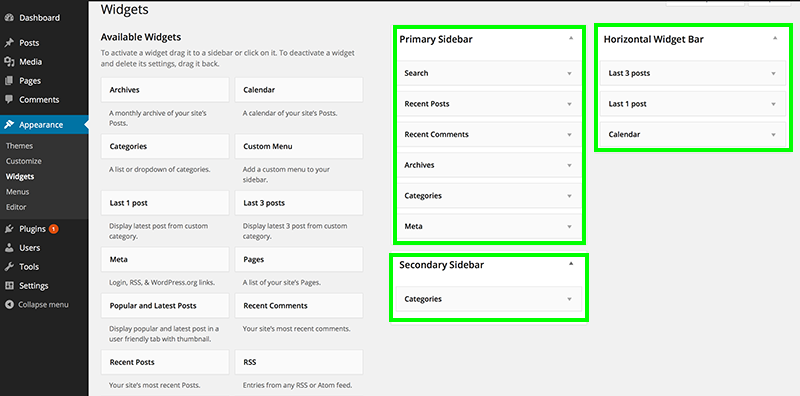
"Popular and Latest Posts" widget is in the Available Widgets Area, drag it to the sidebars (Left or Right) to show Popular e Latest post.

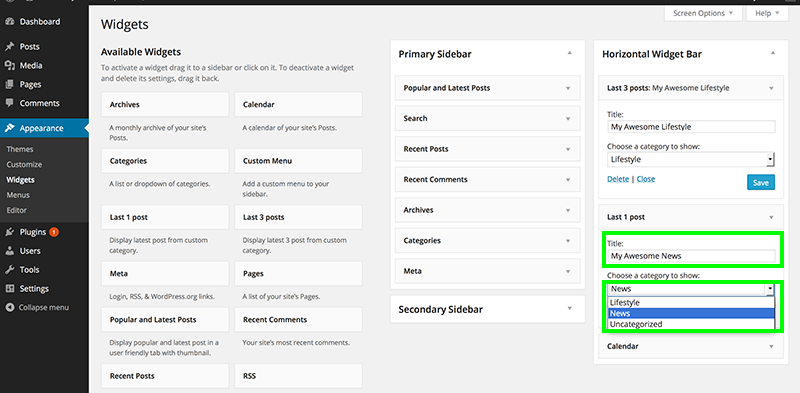
6.1 Horizontal Widget Bar
"Last 1 post" and "Last 3 Posts" widgets are available in the Widgets area, drag them to the sidebar (Horizontal Widget Bar) to show last posts from a specific category.
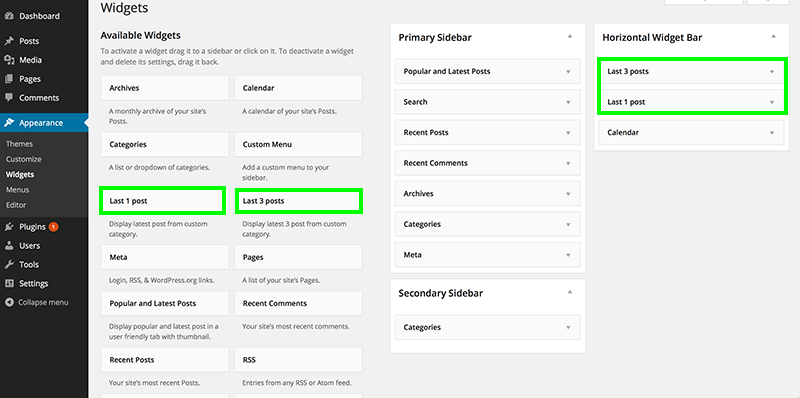
You can insert custom title and select the category where the widget take the posts from.
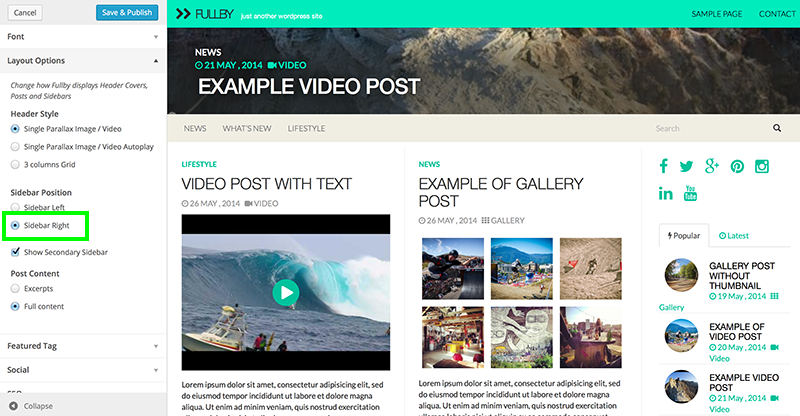
6.2 Sidebar & Horizontal Bar Position and Visualization
You can choose between sidebar on the left or on the right. In the theme customizer section click Layout Options, and select sidebar left or sidebar right.
To show the Horizontal Widget Bar select the checkbox "Show Horizontal Widget Bar in Home"

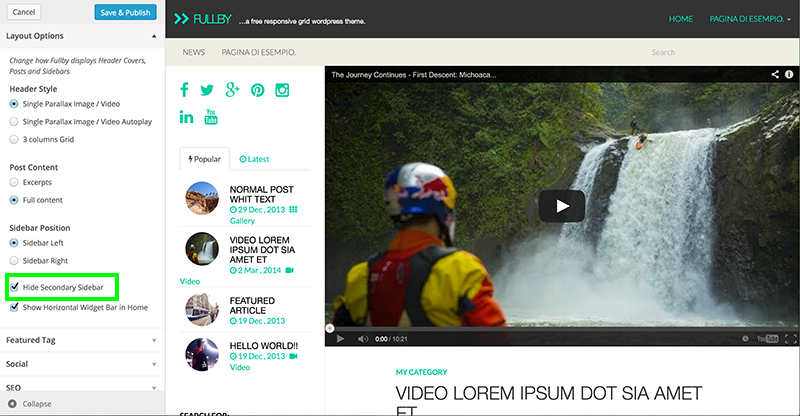
You can hide the second sidebar by select the checkbox "Hide Secondary Sidebar"
6.3 Hide Primary Sidebar Home / Internal Pages
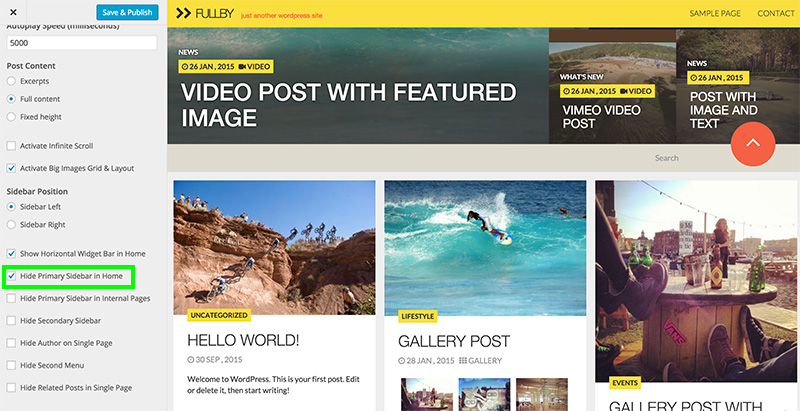
You can hide the primary sidebar in home by select the checkbox "Hide Primary Sidebar in Home" (the result is a beautiful full width grid).
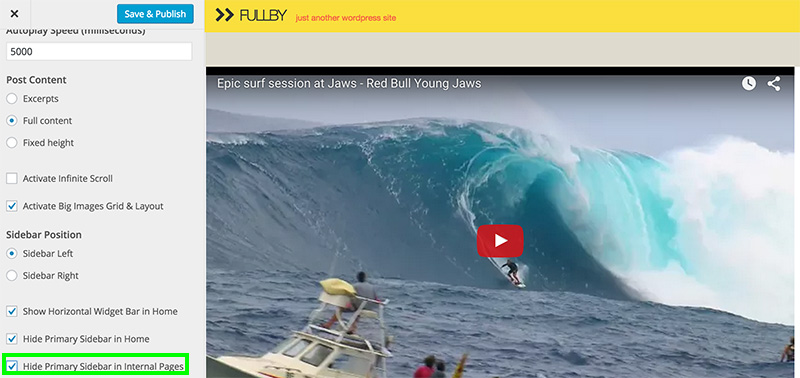
You can hide the primary sidebar in internal pages by select the checkbox "Hide Primary Sidebar in Internal Pages".
6.4 Hide Primary & Secondary Sidebar
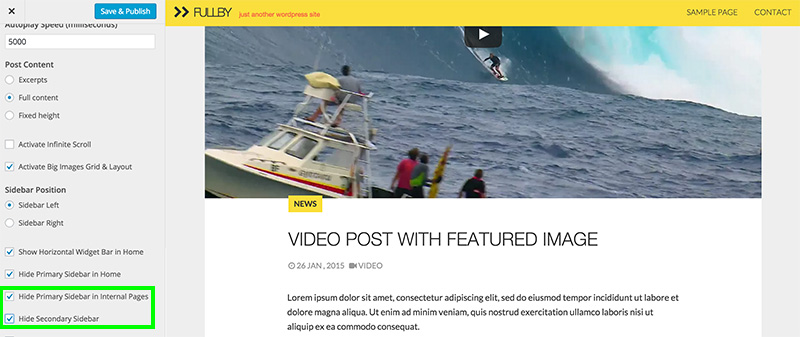
You can hide primary and second sidebar by select the relative checkboxs, the result is a beautiful one column layout on single pages.
7. Setup Layout & Header
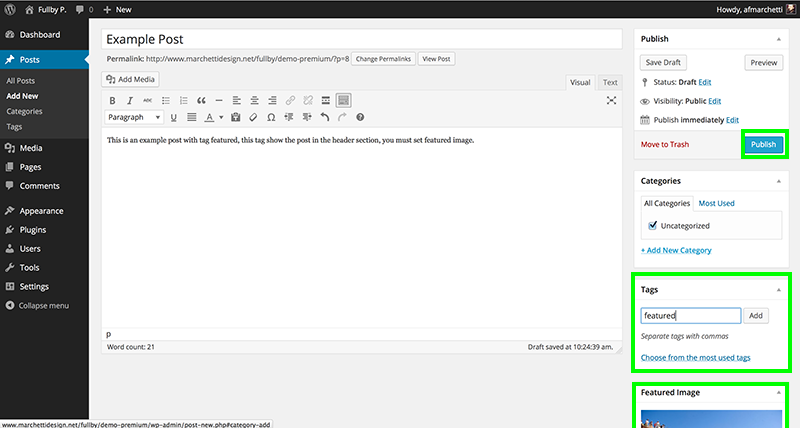
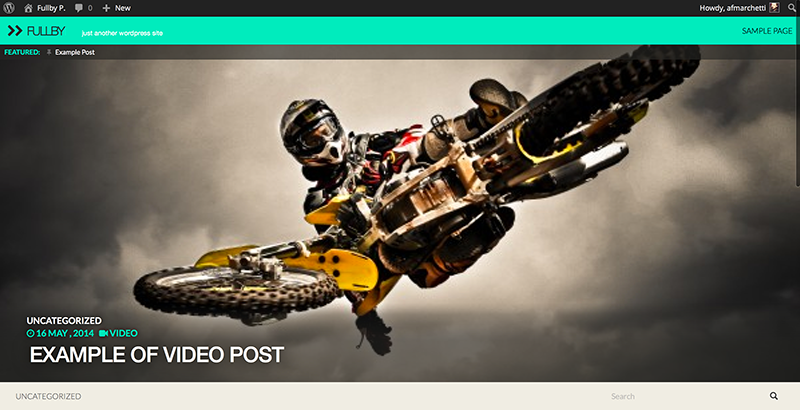
To add post in the Home Header add the tag "Featured" to the article (you must set the post thumnbnail).
7.1 Header Options
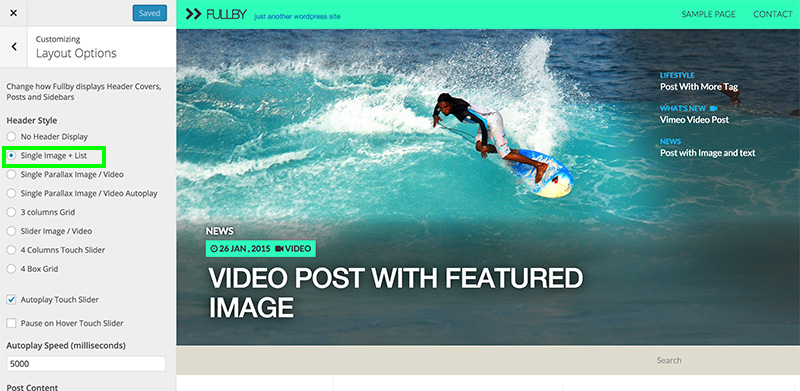
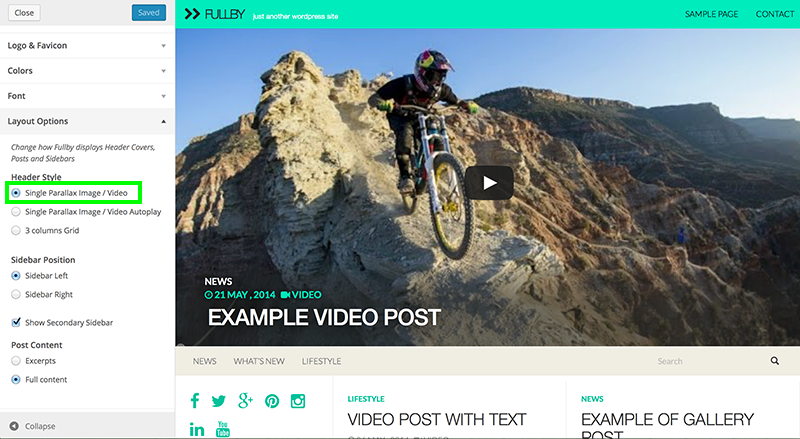
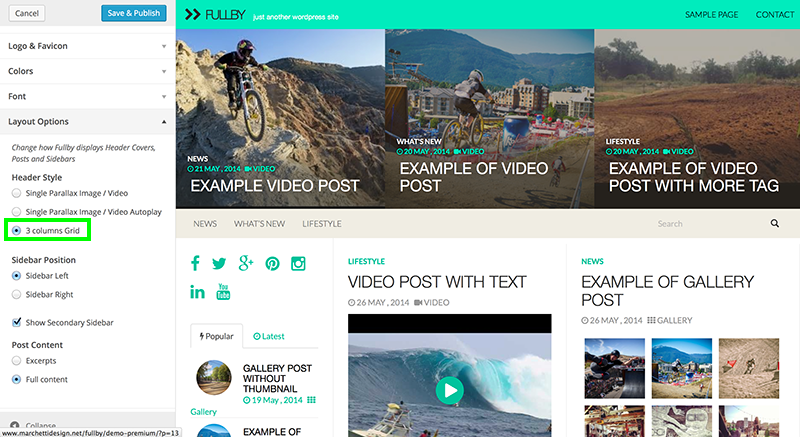
Go to theme customizer section and click Layout Options in the left menu. By default no header are selected. You can choose from 7 header Options:
- Single Image + List (image plus post list on the right)
- Single Parallax Image / Video (image with parallax effect and Video Support)
- Single Parallax Image / Video Autoplay (image with parallax effect and Video Autoplay Support)
- 3 Columns (grid with 3 image, you must set 3 post with featured tag)
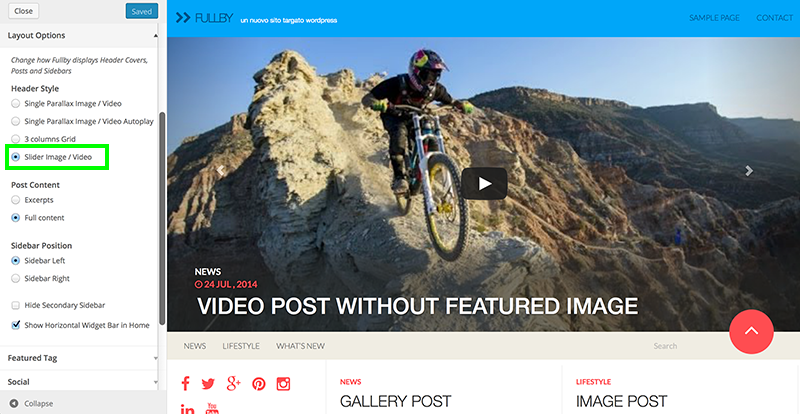
- Slider Image / Video (slider with video support)
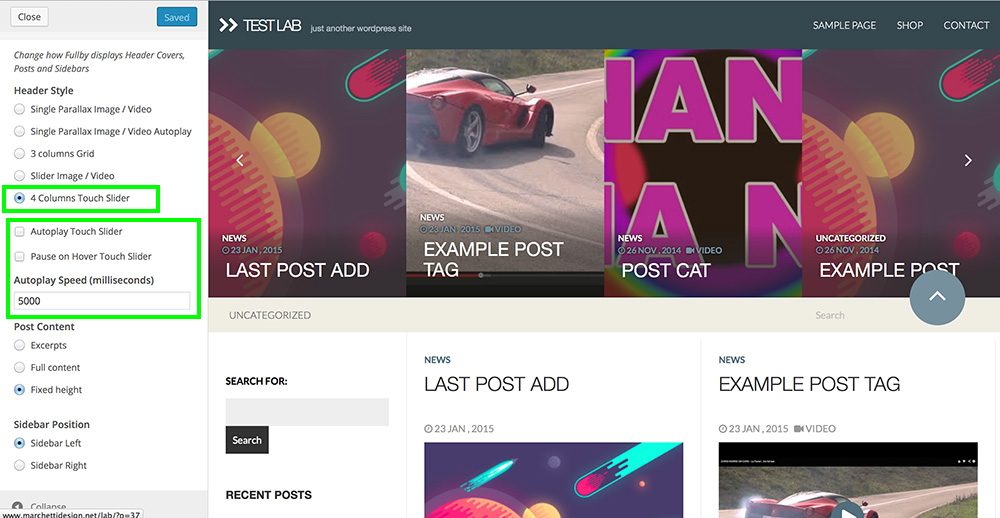
- 4 Columns Touch Slider (slider with touch support)
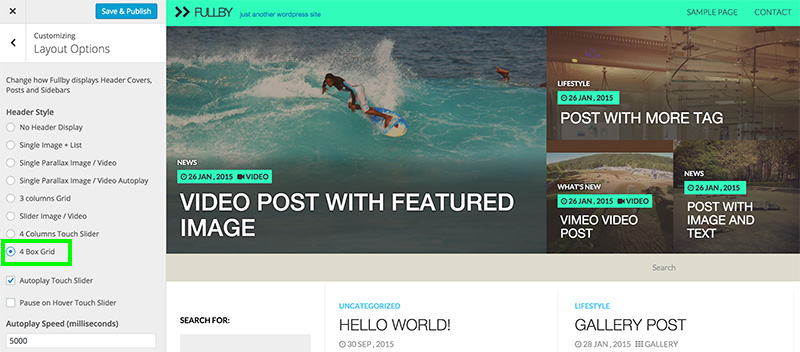
- 4 Box Grid (grid with different box size)
Single Image + List
Single Image Parallax / Video
3 Columns
Slider Image / Video
4 Columns Touch Slider
The Touch Slider show 4 of 8 box in a Horizontal Slider, to scroll drag/touch the box or use the arrows. You can set speed of the slider, autoplay and stop on hover.
4 Box Grid
7.2 Post Grid Visualization
Go to theme customizer section, click Layout Options.
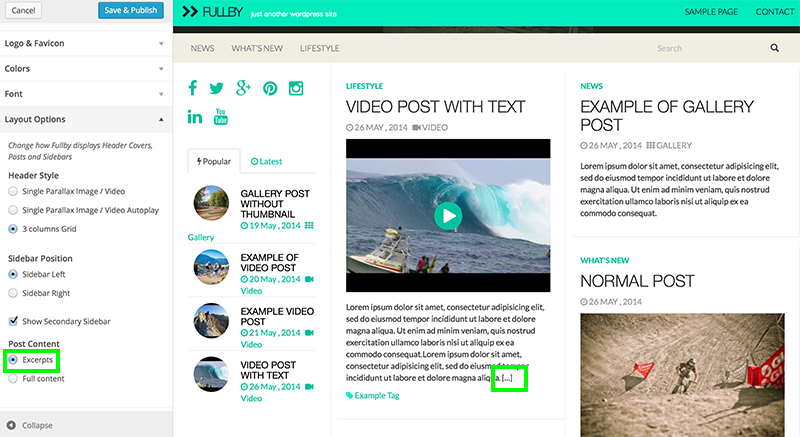
You can choose between use an automatic excerpt (then cut post content after 40 words), show the full content of the post and cut it by more tag or set a Fixed Grid.
Excerpt
More Tag
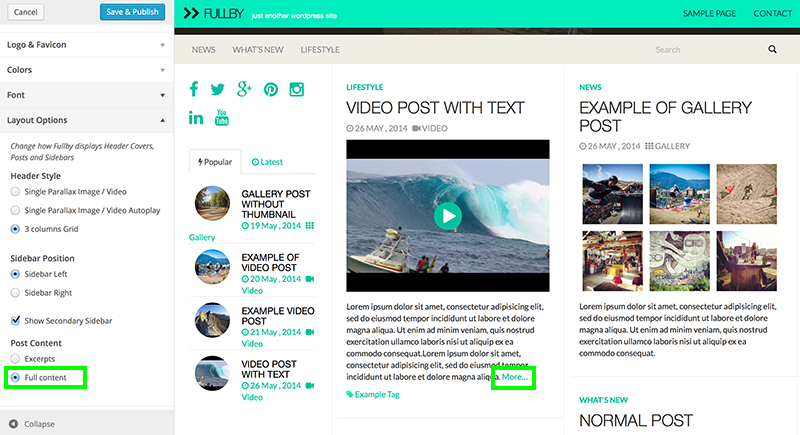
Choose the visualization and click save.
Fixed Grid
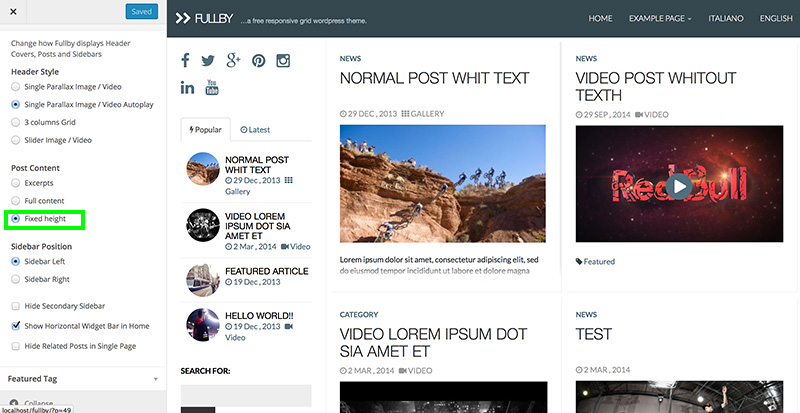
This option make the height of the post in the grid fixed. Choose the visualization and click save.
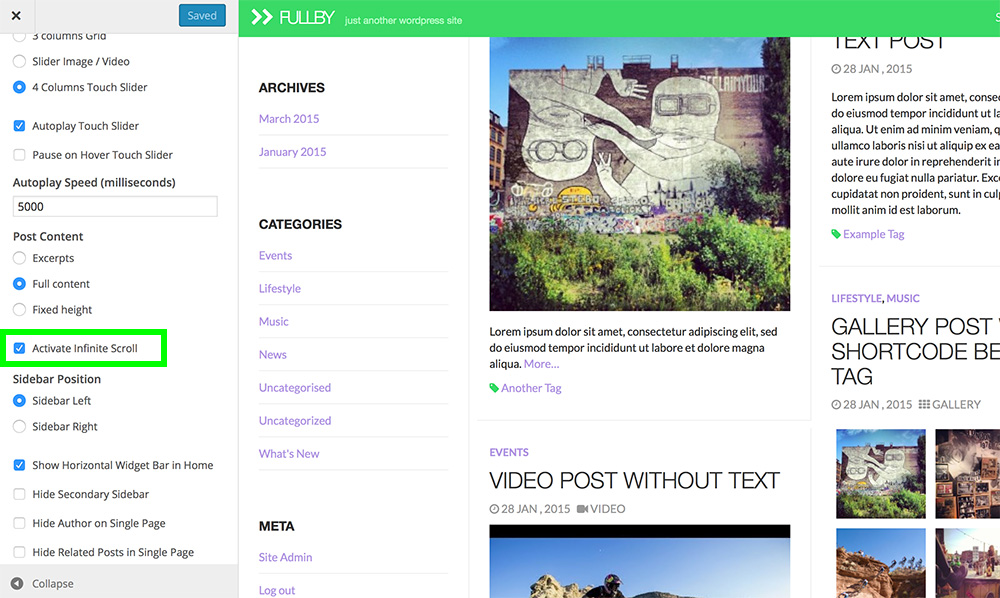
7.2.1 Infinite Scroll
To activate infinite scroll, click Activate Infinite Scroll in Layout Options Section.
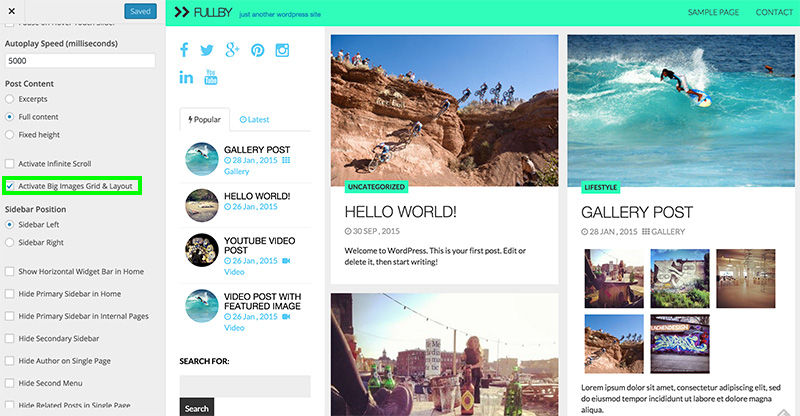
7.2.2 Big Grid Layout
To activate the Big Grid Layout Style, click Activate Big Images Grid & Layout in Layout Options Section.
7.3 Change the default tag "Featured"
The default tag is "Featured", you can change it in a tag of your choice; in the theme customizer section click Featured Tag.
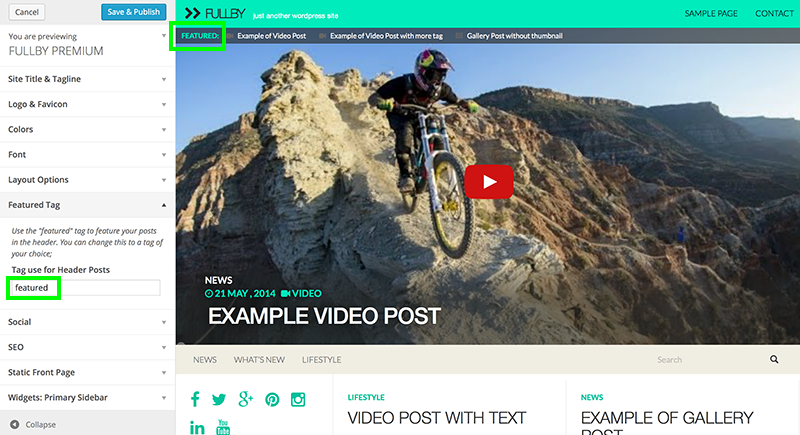
Insert your tag and click save, then add that tag to the posts you want display in the header section.
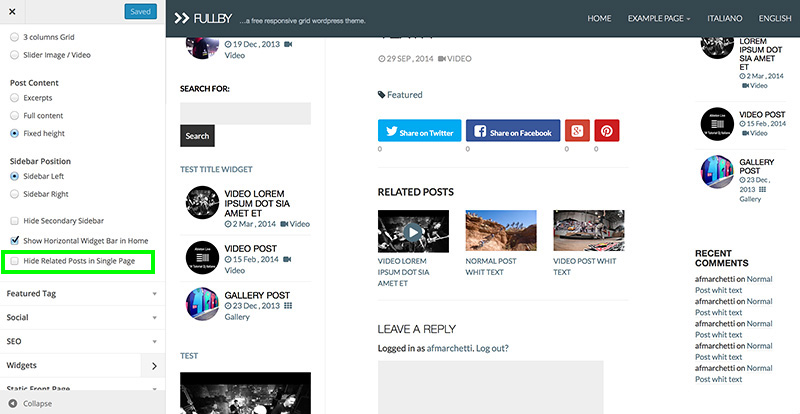
7.4 Related Posts
By default Related Posts are visible in single page, if you want hide them check the option "Hide Related Posts in Single Page" and click Save.
7.5 Author Info
By default Author Info are are visible in single page, if you want hide them check the option "Hide Author on Single Page" and click Save.
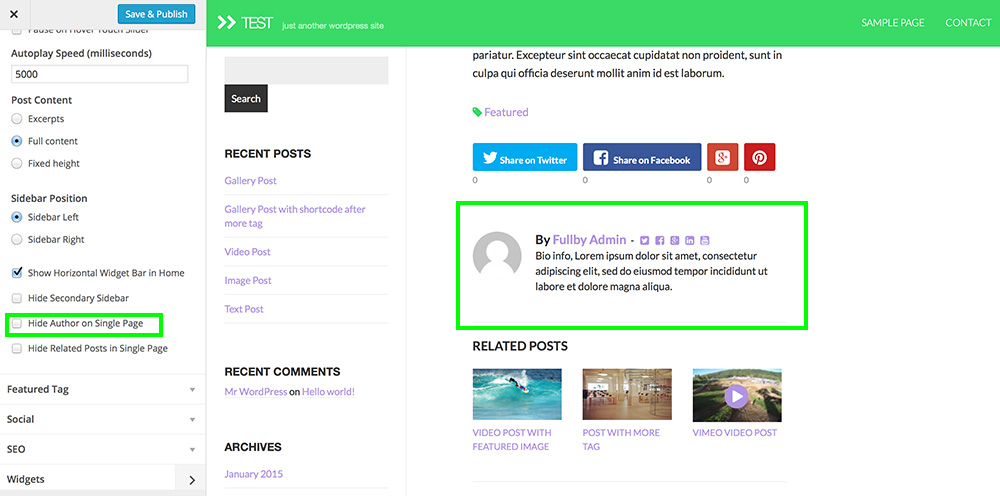
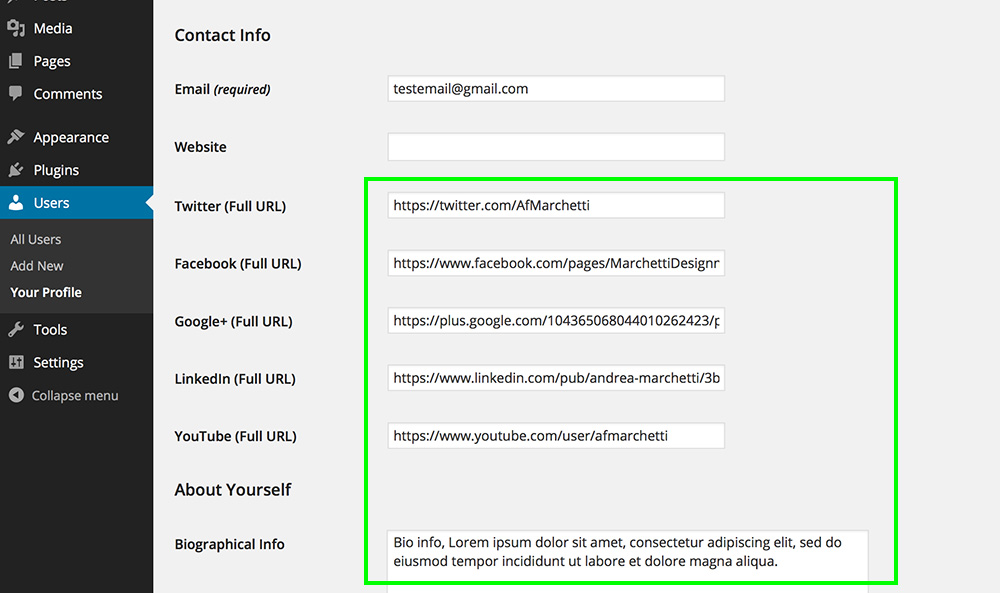
You can inset social links of the author in the user page.
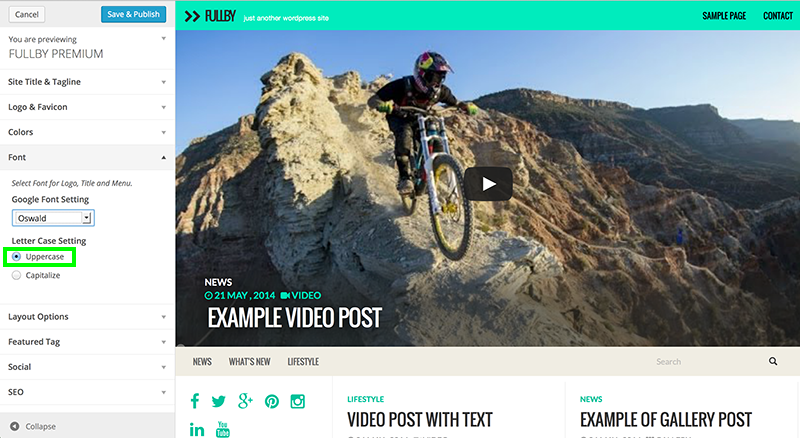
8. Font
You can easily adjust the Font of the Titles, Logo and Menu.
Select Font in the theme customizer section, choose your font and click Save.
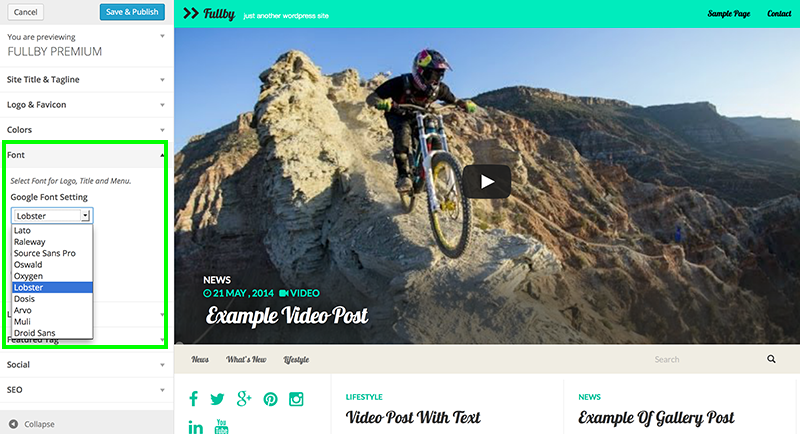
You can choose Uppercase o Capitalize style, by the Letter Case Setting
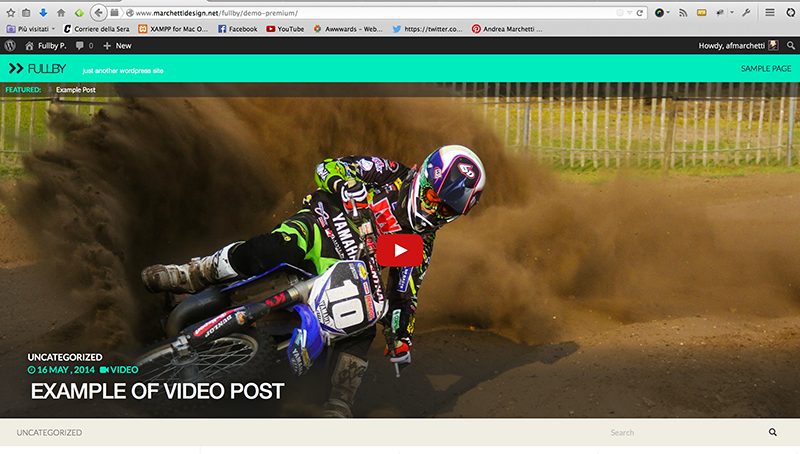
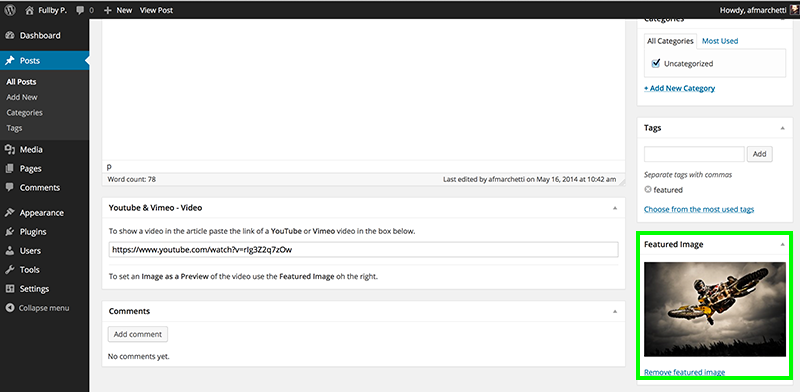
9. Using the Video Support
When you add a new post, to add video paste the url of Youtube/Vimeo video in the Video Box.
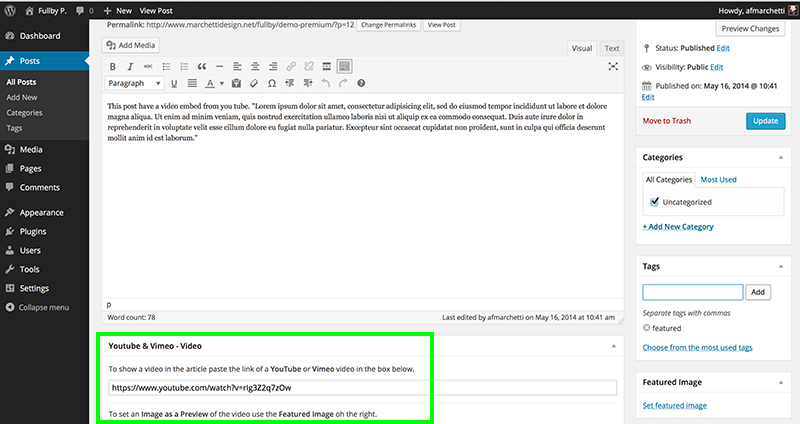
If you have selected a Parallax Header in the Header Options (and add tag featured to the post) the video appears in Home.
if you want set a Custom Image Preview instead of the video, simply add a Featured Image to the post.
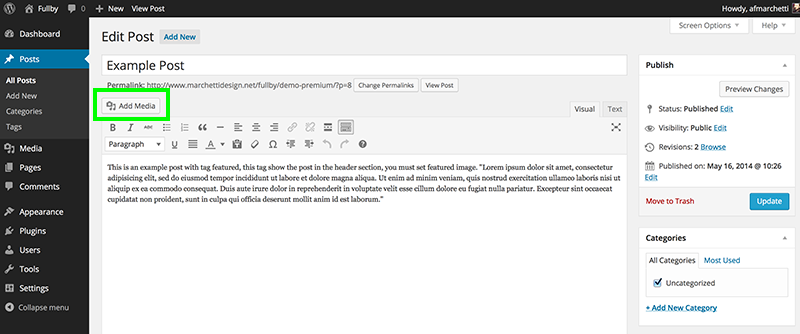
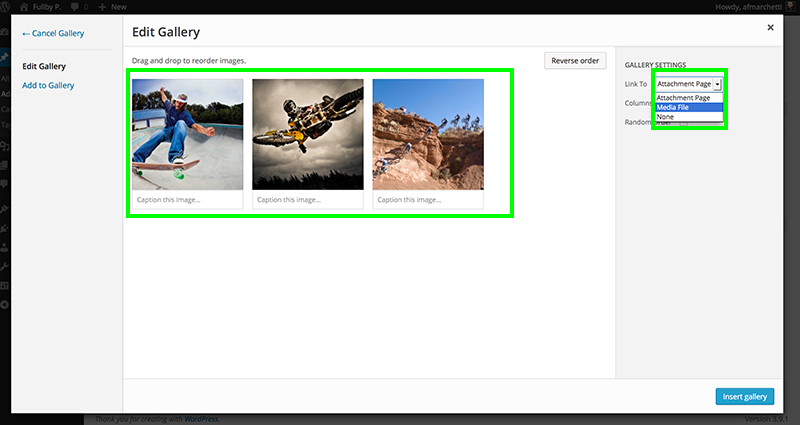
10. Using the Gallery Support
To insert Gallery when you add a new post, click add media button.
Then click Create new gallery in the top left corner. Upload a new file (or select images from the Library) and click Create a new gallery.
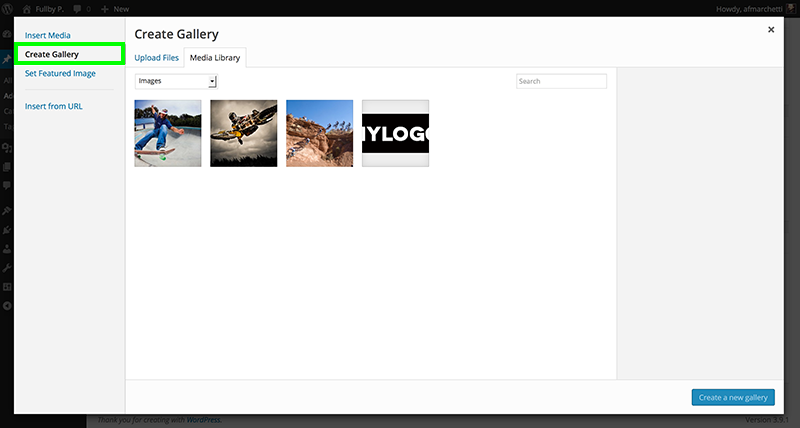
If you want reorder the images by Drag n' Drop, choose Link to: "Media file" (in the select box on top right corner) and click insert gallery.
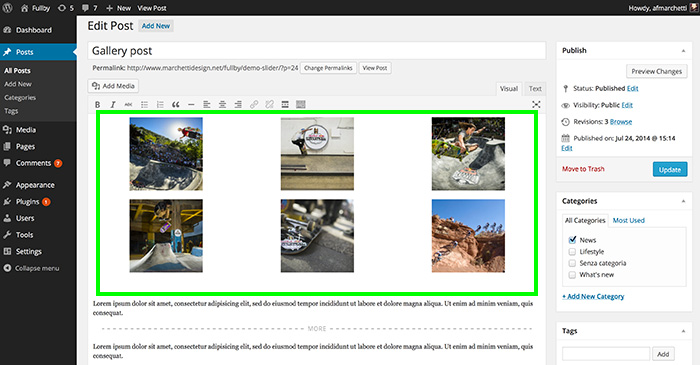
10.1 Gallery with Home Thumbnail
To have the gallery post like the demo:
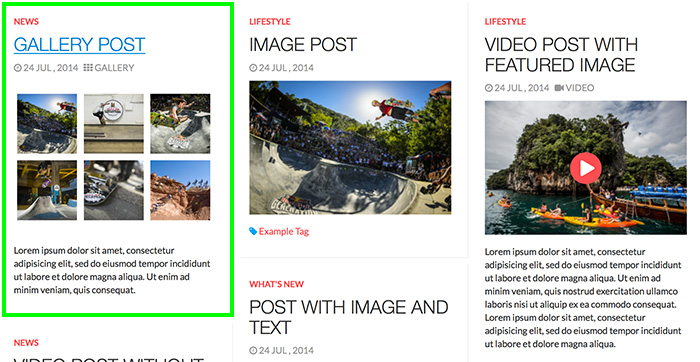
You have open Theme Customizer, click Layout Options and select Full content in post content section.

Now every post content in the home page must be cut by More tag.
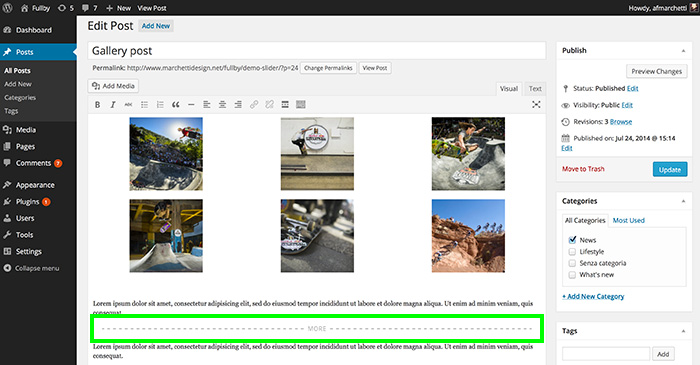
Finnally insert the gallery before the More tag
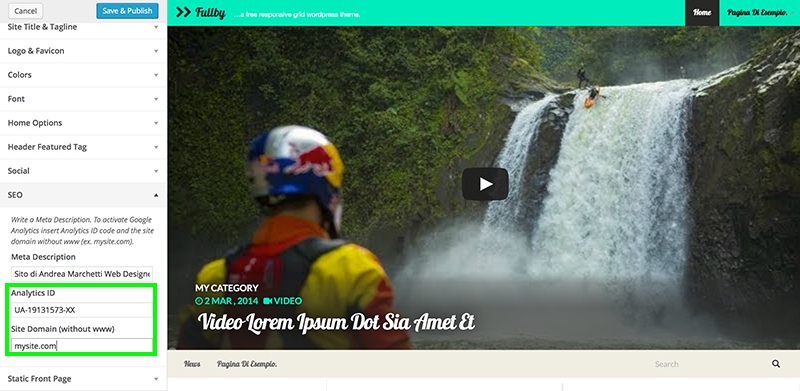
12. SEO & Analytics
To set a custom meta description, go to theme customizer section and click SEO.
Write a description in the meta description box and click Save & Publish.
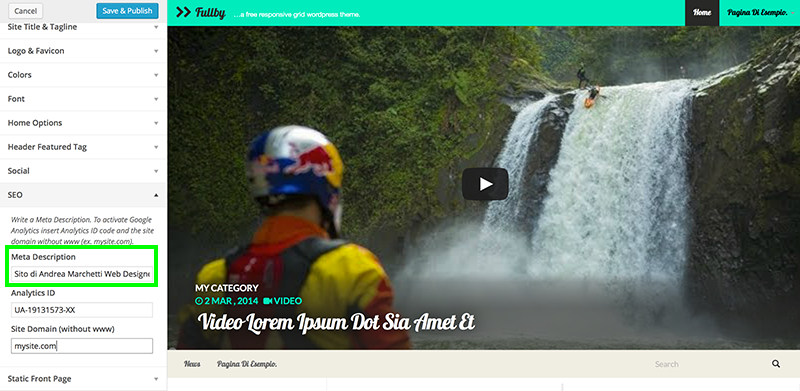
To activate Google Analytics, paste the Analytics Tracking ID in the analytics box and insert your domain name without www in the box below.
13. WooCommerce
To use Woocommerce first of all download the plug-in. Go to Plug-in --> Add New and search woocommerce, than click Install Now.

After that, install core pages by clicking "Install Woocommerce Pages".

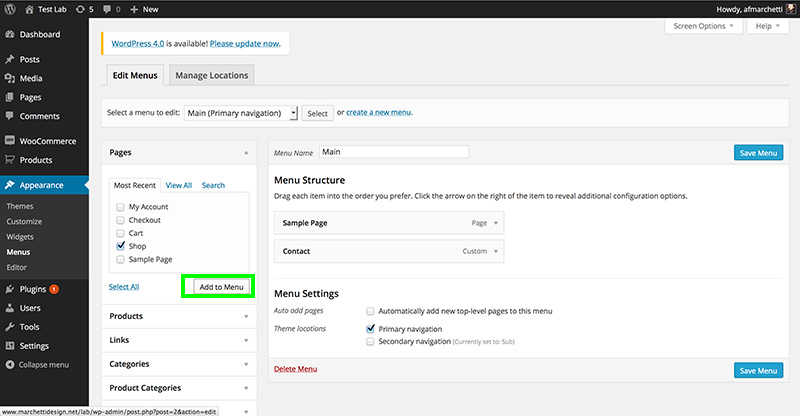
13.1 Add the shop page to the menu
Click Apparence --> Menu, select the shop page and click "Add to menu"
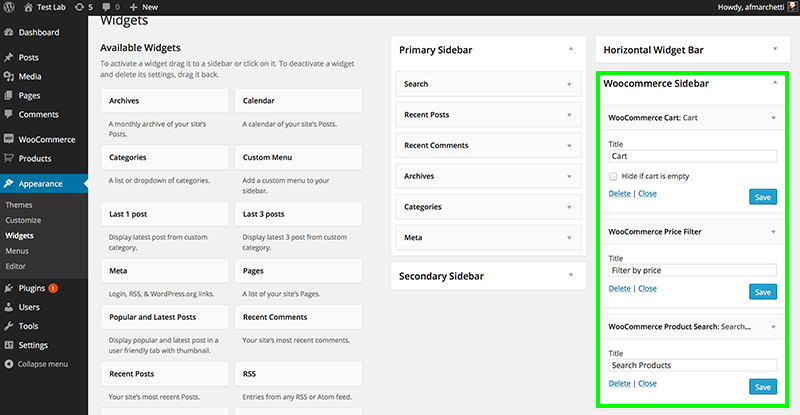
13.2 Add Widgets to WooCommerce Sidebar
Go to Apparence --> Widgets and drag the Woocommerce widget over the sidebar
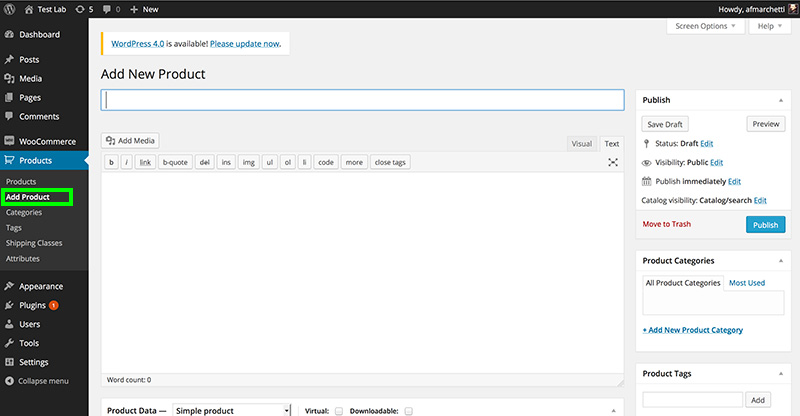
13.3 Add your first product
Click Products than Add Product, set title, description, price, image and click Publish.
For more info about setting Woocomerce and Add Products read this detailed article:
https://www.marchettidesign.net/2014/03/create-an-ecommerce-with-wordpress-and-woocommerce/
13.3 Hide Woocommerce Sidebar
You can hide the woocommerce sidebar by select the checkbox "Hide Woocommerce Sidebar"

14. Sample Content
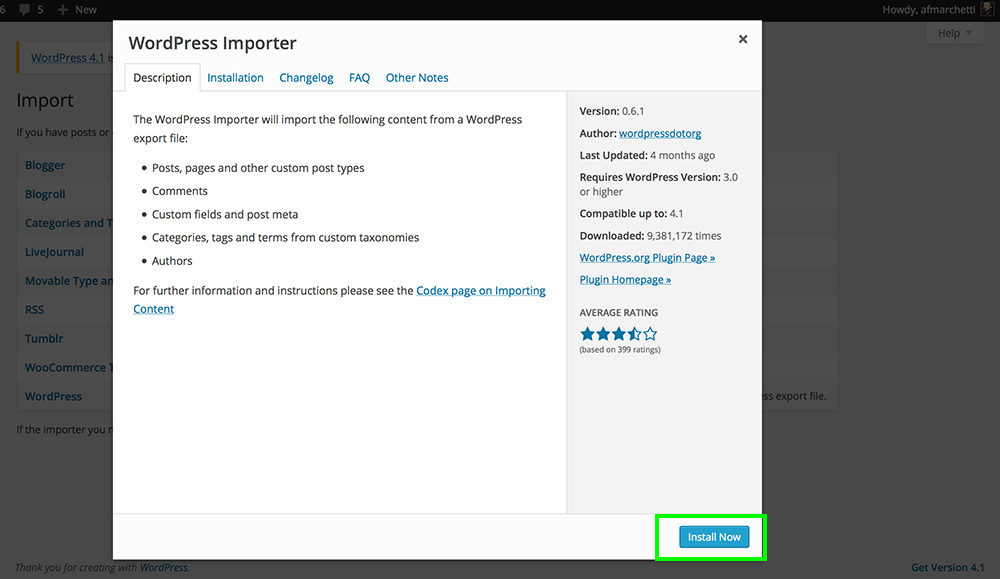
To use Sample Content install the fullby-premium theme and fullby-functionaity plugin. After that go to Tools --> Import and select Wordpress.

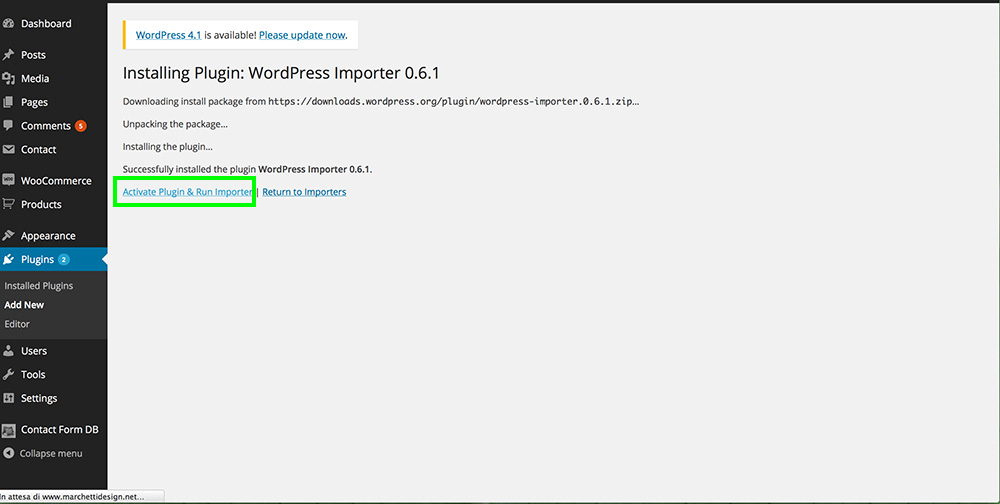
Install the plugin by clicking Install Now.
Activate the plugin.
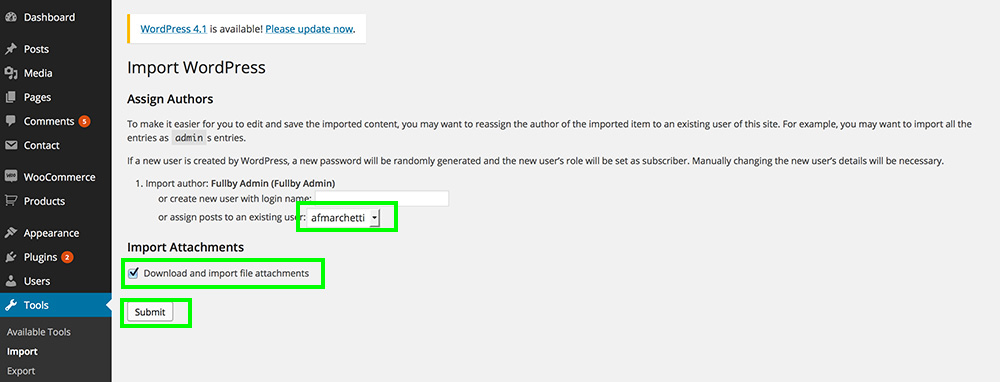
Select on your computer fullby-sample-data.xml (in the Fullby-Master folder) and upload it.

Assign an Author to the posts and select Download and import file attachments than click Submit.
After this assign the Main Menu to Primary navigation and Sub Menu to Secondary Navigation as described in step 5.
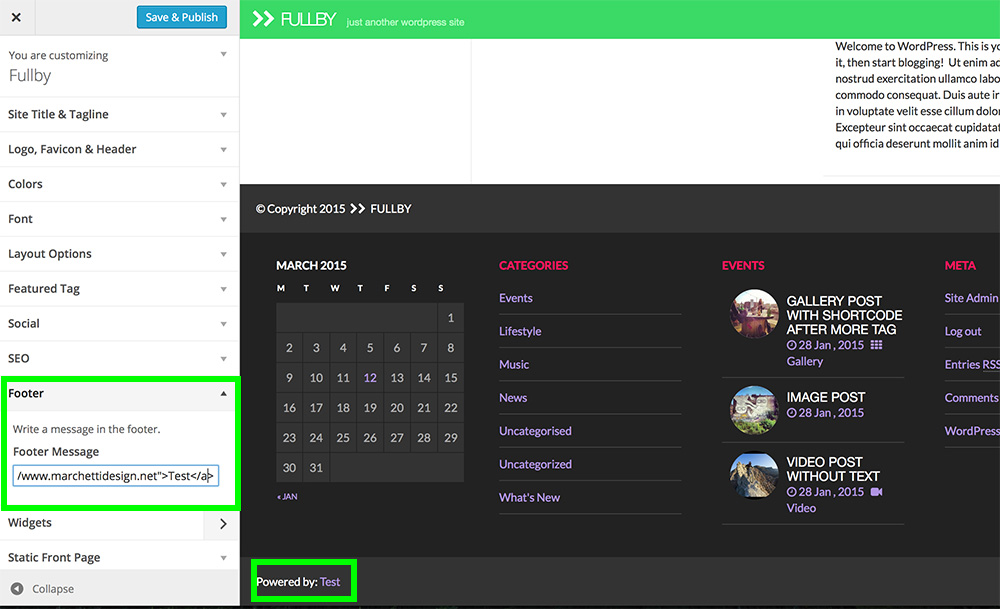
15. Footer
To add widgets in the footer go to Apparence --> Widgets and drag the widgets in the Footer Sidebar.
To show a Message / Credits in the footer go to theme customizer section and select Footer, write a message and click Save.
That's it! thank you!
11. Activate Social Share and Social Buttons
Go to theme customizer section and click Social.
To show share button on single page click "Show share buttons on single page".
To show the Social Buttons in the Primary Sidebar Paste the Link of your social page in the related box and click save.